Most commercial vehicle wraps are not installed as one continuous sheet of vinyl.
A full wrap is divided into panels that fit the printable media, vehicle body, design, and installation process. Those panels meet through planned overlaps, seams, inlays, and natural body breaks.
A visible seam is not automatically a sign of poor workmanship. In many cases, a properly placed overlap improves the reliability and serviceability of the wrap.
The important questions are:
- Where was the seam placed?
- Which direction does the overlap face?
- Is it wide enough for the selected material?
- Does it interfere with important artwork?
- Was it finished correctly?
- Can the vehicle’s doors and panels move normally?
At Pixel Wraps, panel planning begins during design and production—not after the printed graphics reach the installation bay.
This guide explains how professional wrap panels are organized and what fleet owners should expect.
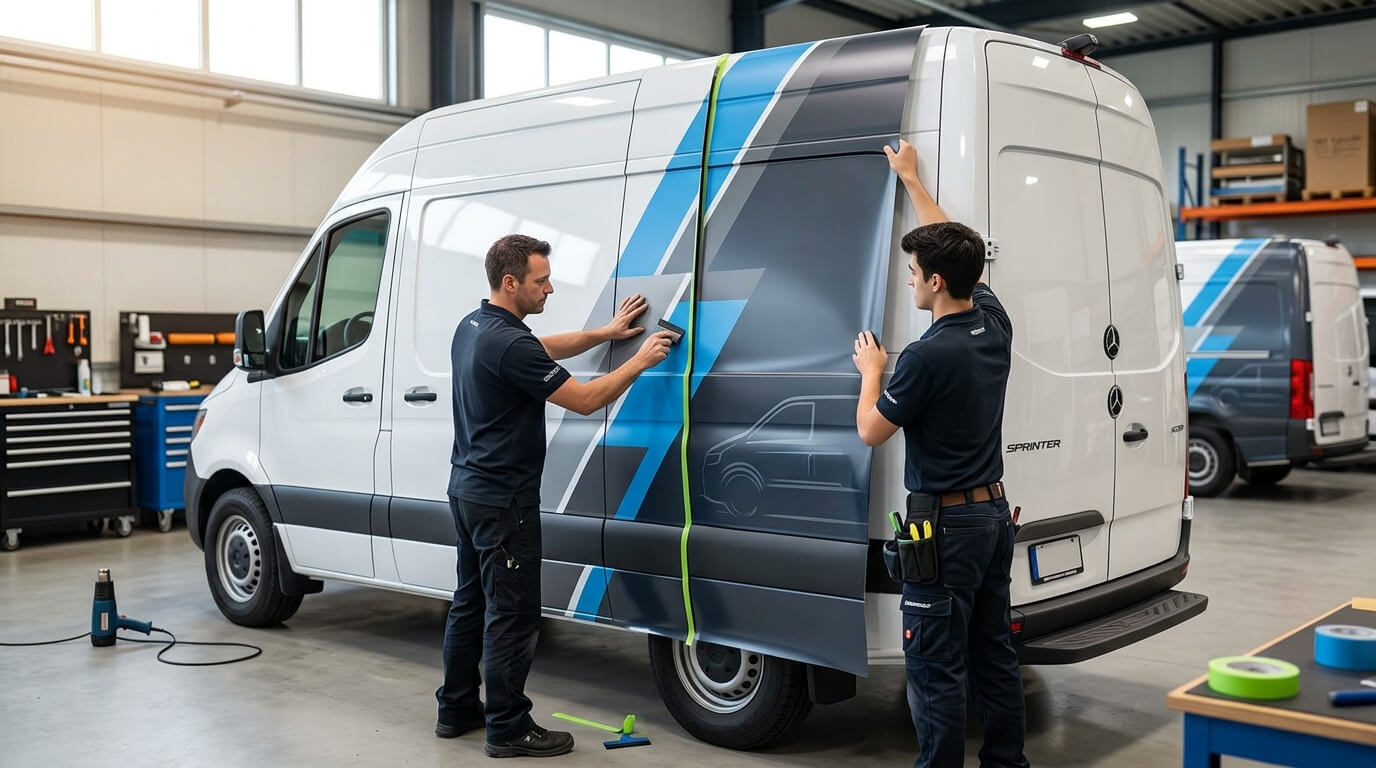
Why Full Vehicle Wraps Need Multiple Panels
Printable vehicle-wrap film is supplied in rolls with defined widths.
A commercial van, box truck, trailer, or bus can be:
- Taller than the available film width
- Longer than a single practical panel
- Broken into several doors and body sections
- Too complex to wrap with one piece
- Designed with separate printed zones
- More serviceable when divided strategically
Even if a roll is technically long enough to cover an entire vehicle side, installing one extremely large panel may not produce the best result.
Large panels are harder to:
- Position
- Align
- Control in the installation bay
- Conform around body features
- Replace after damage
- Handle without contamination
- Match across moving doors
Professional paneling divides the artwork into manageable sections while maintaining visual continuity.
What Is a Wrap Seam?
A wrap seam is the location where two pieces of vinyl meet.
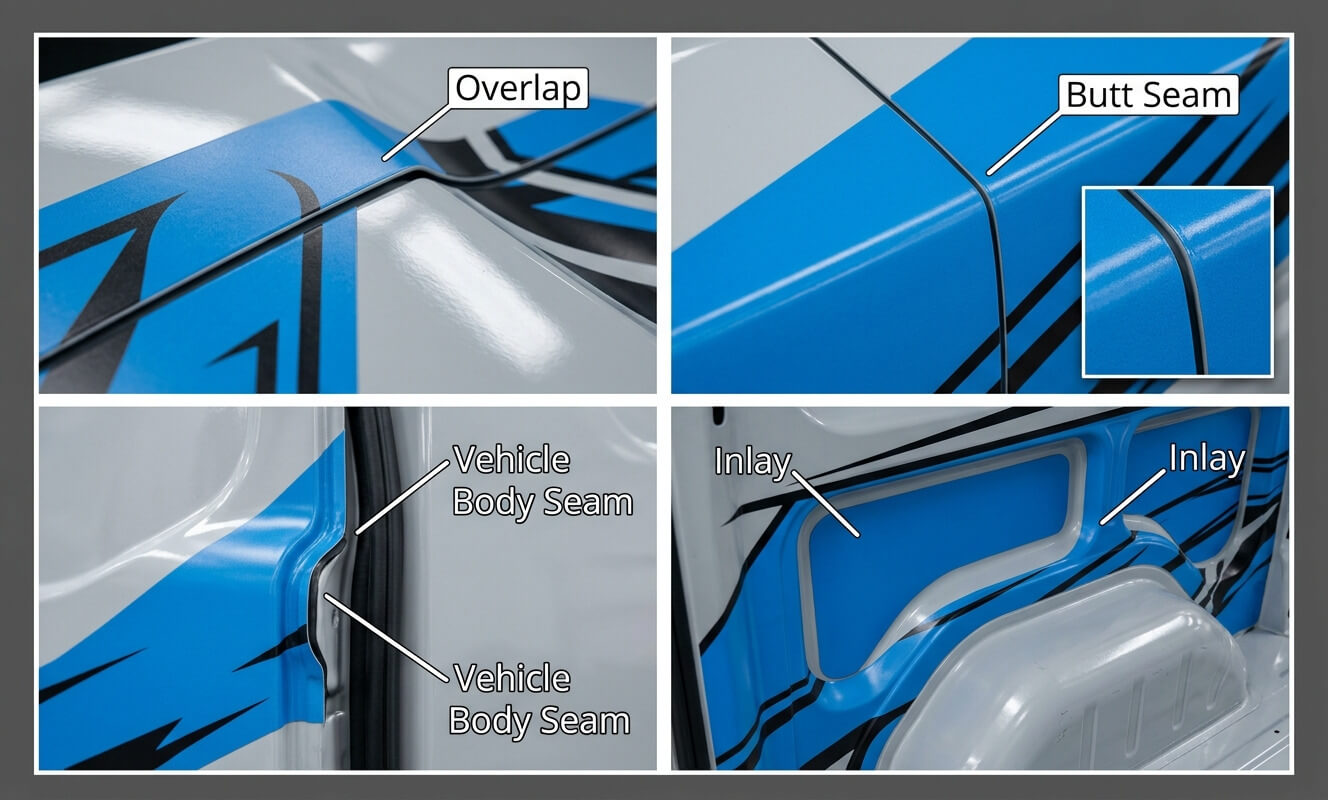
Several types of seams may appear on a vehicle.
Overlap Seam
One vinyl panel extends over the edge of another.
Overlap seams are common in printed commercial wraps because they provide a defined bonding area and allow for normal material movement.
Butt Seam
Two panel edges meet without overlapping.
A butt seam can appear less raised, but even slight shrinkage or movement may expose a visible gap between the panels. It also requires precise alignment.
Butt seams are not the default choice for most exterior commercial vehicle-wrap panels.
Body Seam
A body seam is part of the vehicle—not the printed wrap. It may exist between:
- Doors
- Fenders
- Hood and body
- Cab and truck body
- Removable service panels
- Bumpers
- Cargo compartments
Wrap vinyl usually needs to be cut at moving body seams rather than stretched continuously across them.
Inlay or Overlay
An inlay is a separate piece placed inside a difficult recessed or contoured area. An overlay is a separate piece installed over another section to complete coverage.
These techniques can reduce excessive stretch and improve stability on complex bodywork.
Why Overlaps Are Common on Commercial Wraps
An overlap creates an area where the adhesive of the upper panel bonds to the surface of the panel below.
A properly designed overlap can:
- Reduce the chance of a gap forming between panels
- Allow practical installation of large graphics
- Maintain image alignment
- Support normal material movement
- Make damaged sections easier to replace
- Help prevent wind and moisture from working directly against the exposed edge
The overlap must be compatible with the particular film and laminate.
A universal overlap width should not be assumed for every material. Product-specific guides provide their own requirements.
For example, the current General Formulations AutoMark Vehicle Wrap Application Guide recommends a defined overlap range for the systems covered by that document. Avery Dennison’s North American vehicle-wrap guidelines also specify a minimum overlap for the products addressed in its bulletin.
See the General Formulations AutoMark Vehicle Wrap Application Guide and Avery Dennison Vehicle Wrap Guidelines.
The current technical instructions for the selected film should determine the final construction.
The Direction of the Overlap Matters
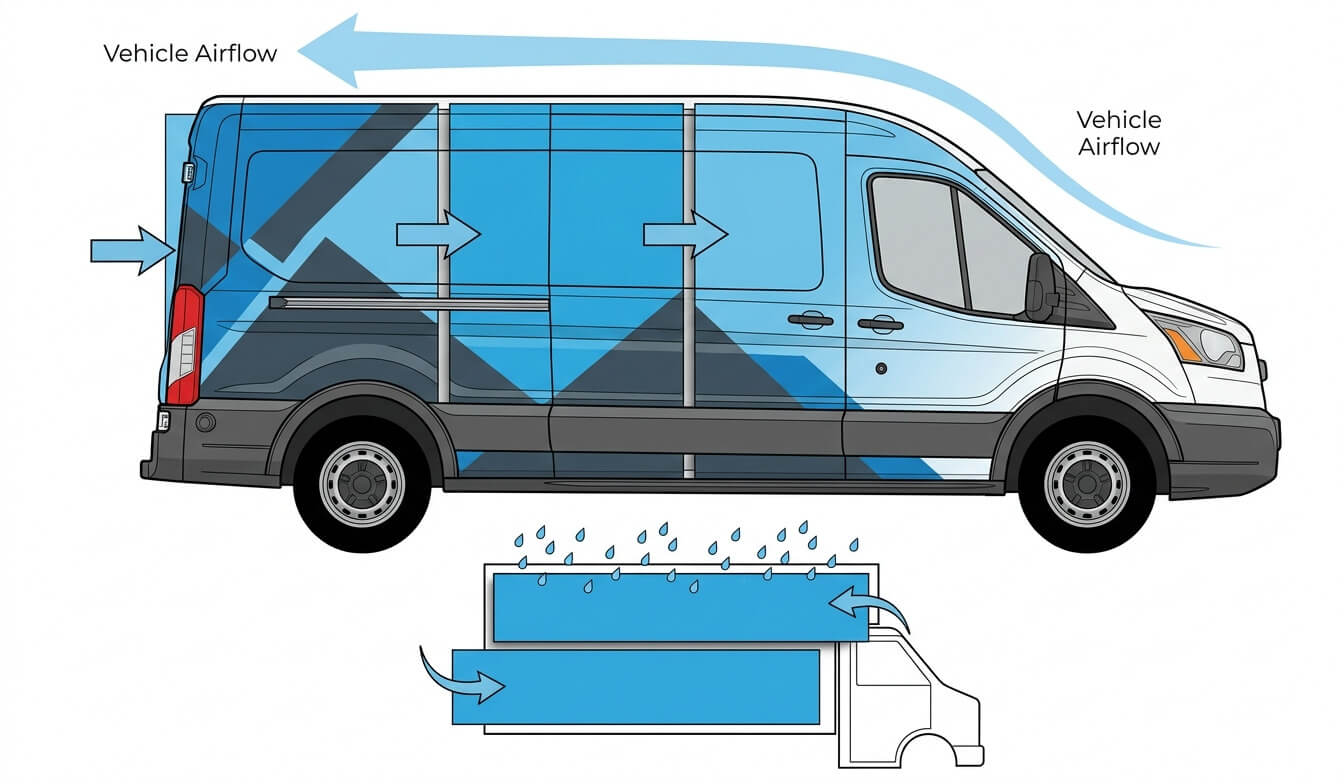
Vehicle-wrap overlaps should be planned around airflow and water movement.
For vertical panels, manufacturers commonly instruct installers to begin at the rear and work toward the front. This produces overlaps oriented to reduce direct exposure of the edge to forward vehicle movement.
For horizontal panel layouts, installation commonly begins at the bottom and works upward. This helps arrange overlaps so water is less likely to collect against an upward-facing edge.
3M’s panel-application guidance advises planning overlapping panels so they do not trap moisture and so vehicle overlaps face away from airflow.
See the 3M Instruction Bulletin 5.4.
General Formulations similarly instructs installers to work from the rear forward for vertical panels and from the bottom upward for horizontal panels.
Overlap direction should be considered during panel setup. Reversing panel order after printing can create avoidable exposure and alignment problems.
Panel Placement Begins With the Design
Seams should not be treated as an installation-only decision.
The designer should know where the artwork will be divided before final production.
Poor seam placement can cut through:
- Logos
- Faces
- Phone numbers
- Website addresses
- QR codes
- Fine patterns
- Small lettering
- Product photography
- High-contrast focal areas
Pixel Wraps plans panels so important content remains readable and the seam is placed in a lower-attention area whenever the vehicle and material allow it.
Natural placement opportunities can include:
- Door gaps
- Body moldings
- Color transitions
- Background texture
- Low-contrast graphic areas
- Changes in vehicle geometry
- Existing panel breaks
A seam may still cross part of the image on a complex vehicle. The objective is to manage its visual effect without weakening the physical installation.
The Key Panel Establishes Alignment
The first important panel placed on a vehicle is sometimes called the key panel.
Its position can establish:
- Overall design height
- Logo location
- Horizontal alignment
- Relationship to door handles
- Connection to neighboring panels
- Position of major text
- Graphic flow across the vehicle
If the key panel is misaligned, the error can continue across the remaining panels.
Professional installation includes dry positioning or measuring before final pressure is applied. Vehicle templates help with design, but the installer must work from the actual vehicle.
Production vehicles can vary because of:
- Model year
- Wheelbase
- Roof height
- Factory options
- Body repairs
- Service bodies
- Aftermarket equipment
- Trim packages
The real vehicle is the final installation reference.
Vehicle Templates Are Not Perfect Measurements
Vehicle templates are useful design tools, but they are usually simplified two-dimensional representations.
They may not show every:
- Curve
- Channel
- Handle
- Sensor
- Camera
- Hinge
- Badge
- Trim piece
- Door gap
- Aftermarket accessory
A design should include reasonable safety margins around critical content.
Small text placed tightly beside a body line on the template may move into a recess or door gap on the real vehicle.
At Pixel Wraps, we combine vehicle templates with photographs, measurements, and physical inspection when the project requires more precise placement.
Wrap Film Should Be Cut at Moving Body Gaps
Doors, hoods, tailgates, and removable panels move independently.
If vinyl bridges a moving body seam, normal vehicle movement can pull the film away from the surface.
3M’s current vehicle-application bulletin instructs installers to cut film at vehicle body-panel seams because these areas flex as the vehicle moves. It also calls for resqueegeeing edges and overlaps before the vehicle is released.
See the 3M Application: Vehicles Instruction Bulletin.
Properly cut body gaps allow:
- Doors to open normally
- Panels to move without pulling the wrap
- Edges to be finished individually
- Damaged doors to be replaced or repaired
- Moisture to drain as the vehicle was designed
Vinyl should not obstruct latches, sensors, cameras, lights, drain openings, safety labels, or required vehicle information.
Cutting Technique Matters
Vehicle-wrap film must often be trimmed around doors, handles, panels, lights, and edges.
Careless cutting can score the clear coat or paint beneath the vinyl. The damage may remain hidden until the wrap is removed.
Professional installers use methods appropriate to the area, which can include:
- Controlled blade depth
- Body-line cutting
- Knifeless tape
- Precut panels
- Removing components when practical
- Safe edge-finishing methods
Knifeless tape allows selected cuts to be made through the vinyl without placing a blade directly against the paint. It does not replace installer judgment in every area.
Fleet owners should avoid pulling back a wrap edge merely to inspect for blade marks. Concerns should be evaluated through the provider’s inspection process.
Why Deep Recesses May Need Inlays
Forcing one piece of vinyl into every recess can create excessive tension.
The film may look smooth at delivery but try to return toward its original shape later.
A separate inlay can be the more reliable choice when the vehicle has:
- Deep channels
- Sharp compound curves
- Tight corners
- Difficult handle cups
- Complex bumper sections
- Narrow recessed areas
The inlay creates an additional seam, but it can reduce stretch and improve the completed construction.
Avery Dennison’s vehicle-conforming bulletin emphasizes distributing stretch over a larger material area and provides product-specific instructions for overlapping panels and post-heating.
See Avery Dennison Instructional Bulletin 1.17.
An honest installation plan may include a carefully placed seam rather than an unrealistic promise of one-piece coverage.
Rivets and Corrugated Panels Require Special Planning
Box trucks and trailers often contain:
- Rivets
- Corrugations
- Panel joints
- Repair patches
- Structural seams
- Fasteners
These features affect both panel layout and installation technique.
A seam should not be placed arbitrarily where rivets or corrugations prevent reliable contact. The installer may need to:
- Adjust panel width
- Work graphics around a structural joint
- Use a film approved for riveted surfaces
- Apply product-specific heat and pressure
- Seal or finish edges according to the system
- Keep critical text away from uneven areas
The material suitable for a smooth cargo van is not automatically the best choice for every trailer surface.
Window Graphics Are Separate Panels
Perforated window film is a different product from opaque body-wrap vinyl.
It should be designed and installed as a separate construction.
Important considerations include:
- Approved view-through film
- Optically clear overlaminate when required
- Window-edge finishing
- Legal visibility requirements
- Rear-window wipers
- Defroster lines
- Emergency exits
- Seals and gaskets
- Driver sightlines
An opaque body panel should not simply continue across a window when visibility is required.
The visual design may align across the window and body, but the materials and panel edges must be planned separately.
Door Jambs and Hidden Areas
Commercial fleet wraps generally prioritize the visible exterior advertising surface.
Door jambs, deep interior returns, engine-bay edges, and concealed areas may not be included unless they are specifically listed in the scope.
Wrapping every hidden painted surface can:
- Increase labor
- Add seams
- Require more disassembly
- Create additional edges
- Extend vehicle downtime
- Increase project cost
A customer should confirm whether the quote includes:
- Exterior face only
- Visible door returns
- Full door jambs
- Interior door edges
- Roof
- Bumpers
- Mirrors
- Handles
- Spoilers
- Plastic trim
The scope should be written before production begins.
Seams Can Make Fleet Repairs Easier
Strategic paneling supports future repairs.
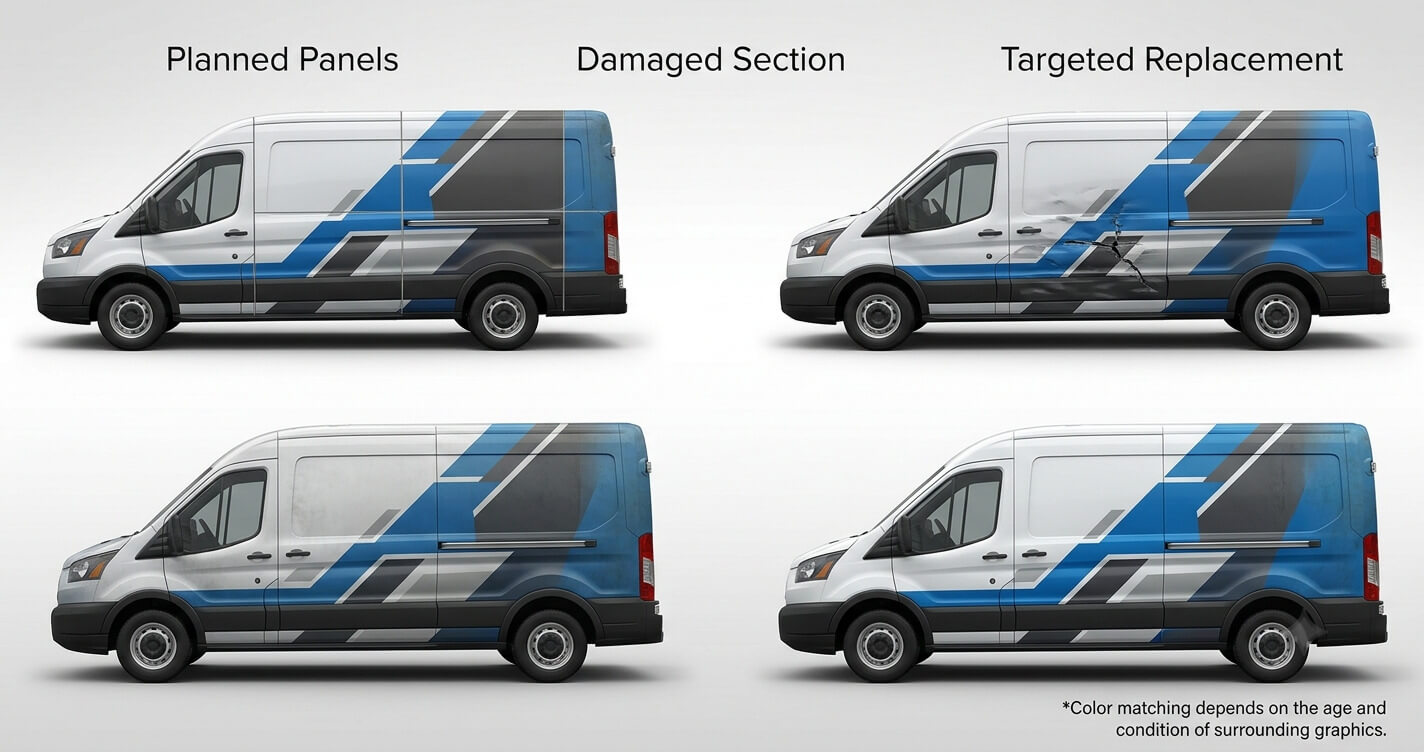
If a door is damaged, the provider may be able to reprint and replace the corresponding section instead of the entire vehicle side.
A practical repair panel plan can reduce:
- Material use
- Installation time
- Vehicle downtime
- Cost
However, a new panel may not match an older wrap exactly because of fading, laminate aging, material lots, and production changes.
Panel placement should therefore balance:
- Initial appearance
- Installation reliability
- Repair practicality
- Future color matching
Sometimes replacing a larger logical section produces a cleaner result than replacing one small panel.
When Is a Visible Seam Normal?
A visible seam can be normal when it is:
- Straight or intentionally shaped
- Properly overlapped
- Oriented according to the panel plan
- Firmly adhered
- Located away from critical content when practical
- Required by vehicle size or geometry
- Used to reduce excessive stretching
- Finished consistently
- Compatible with the manufacturer’s instructions
Seams may be more noticeable in:
- Solid dark colors
- High-gloss finishes
- Strong side lighting
- Smooth low-detail backgrounds
- Eye-level areas
- Freshly cleaned vehicles
A professional wrap is a functional graphic system, not painted artwork with no material boundaries.
Signs of Poor Seam or Panel Work
A seam should be inspected when it shows:
- Lifting edges
- Trapped dirt beneath the overlap
- Irregular or jagged cutting
- Inadequate overlap
- Significant image misalignment
- Open gaps between intended overlapping panels
- Wrinkles extending from the seam
- Moisture collection
- Excessive tension
- Unsealed body gaps
- Vinyl bridging moving parts
- Cuts extending visibly into paint
- Placement directly through important text without a design reason
Not every irregularity indicates a material defect. The provider should inspect the area and determine whether the cause involves installation, physical damage, vehicle condition, or normal aging.
How to Care for Wrap Seams and Edges
Fleet drivers and maintenance teams should avoid directing high-pressure water against seam edges.
Care practices include:
- Wash from the center of the panel toward edges
- Keep pressure-washer nozzles at an appropriate distance
- Avoid spraying sharply into overlaps
- Use mild wrap-compatible cleaning products
- Do not pick at raised edges
- Report lifting promptly
- Avoid aggressive brushes
- Clean fuel and road contaminants without delay
- Do not glue or tape a lifting seam before inspection
A small edge problem may be repairable when reported early. Continued pressure washing or picking can turn it into a larger panel replacement.
What Pixel Wraps Reviews During Panel Planning
| Project factor | Panel-planning effect |
| Printable media width | Establishes practical panel dimensions |
| Vehicle body shape | Determines where film can conform and where inlays may be needed |
| Door and body gaps | Moving panels require separate finishing inlays may be needed |
| Door and body gaps | Moving |
| Airflow and water | Influence overlap direction |
| Artwork | Important content should avoid seams when possible |
| Material instructions | Establish overlap and finishing requirements |
| Installation sequence | Determines the key panel and alignment and order |
| Repair planning | Logical sections can simplify later replacement |
| Window coverage | Requires separate material and edge planning |
| Fleet consistency | Repeated panel layouts support production across similar vehicles |
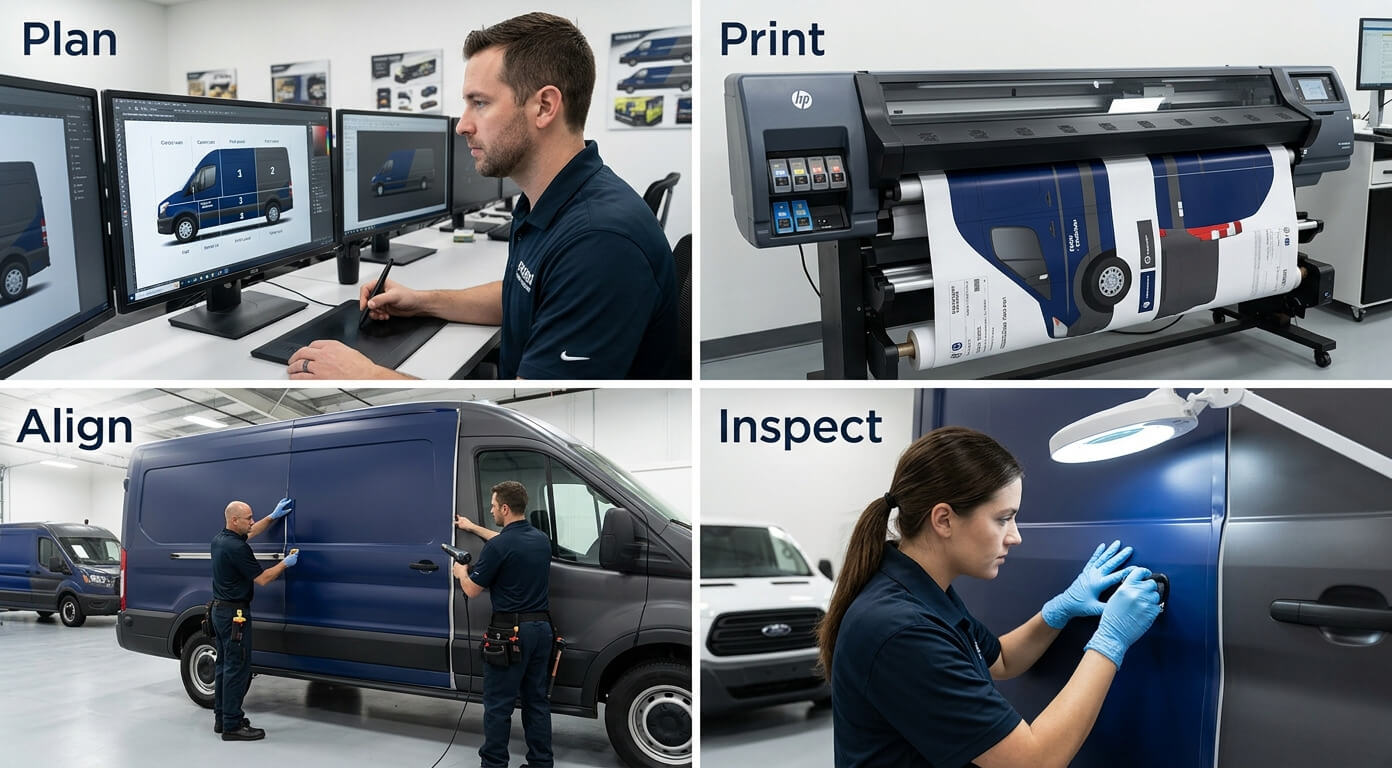
Pixel Wraps’ Panel-to-Installation Workflow
Our process connects panel decisions across the project.
It includes:
- Reviewing the exact vehicle model
- Inspecting photographs and available measurements
- Placing important branding away from difficult areas
- Dividing the design into practical print panels
- Adding required bleed and overlap
- Selecting the key panel
- Printing connected panels in a controlled sequence
- Labeling and organizing the graphics
- Dry-positioning critical panels on the vehicle
- Installing in the planned order
- Cutting and finishing body gaps
- Applying inlays where appropriate
- Resqueegeeing seams and edges
- Inspecting alignment and finish
- Recording the project for possible repairs
This approach helps the design, production, and installation teams work from one panel strategy.
Good Seams Are Planned, Not Hidden
A commercial vehicle wrap may require seams because of the media width, vehicle size, body geometry, design, or future service needs.
The goal is not to promise that every wrap will be seam-free.
The goal is to create seams that are:
- Structurally appropriate
- Visually controlled
- Correctly oriented
- Compatible with the film
- Positioned around the vehicle’s movement
- Practical to repair
- Properly finished
At Pixel Wraps, panel placement is coordinated across design, in-house printing, lamination, and installation so seams do not become a last-minute field decision.
Discuss Your Vehicle’s Panel Plan With Pixel Wraps
If your fleet includes high-roof vans, box trucks, trailers, buses, service bodies, or other complex vehicles, ask how the graphics will be divided before approving production.
Pixel Wraps can explain:
- Expected panel locations
- Seam direction
- Areas requiring inlays
- Body sections excluded from coverage
- Window-graphic treatment
- Repair strategy
- Roof and jamb coverage
- Installation sequence
Contact our team to discuss a commercial vehicle-wrap design and panel plan built around your actual vehicle.